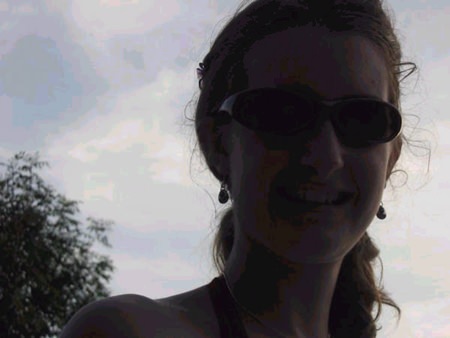
It is quite a while since I mentioned Contre Jour, but it is such an important factor in photography that it is important to learn how to handle it.
Now to explain why this technique is in French – simply, the French were first into photography, so I suppose they are entitled to give us photographic terms such as ‘Contre Jour’ (literally ‘against the light’).
However, most photographers (French included) seem to be a little in awe of Contre Jour photography, and stick to the old maxim of having the light source (generally the sun) coming from behind the photographer. If you do this, you will be assured of a reasonable, but ordinary photograph, which will record your friend at the beach, and otherwise be totally unmemorable.

No, if you want something a little better, it is time for ‘Contre Jour’. The only difficulty with back-lighting, which is the other (English) name for ‘Contre Jour’, is in getting the correct exposure. For example, a girl on the beach photograph, when you take a full-length shot, the person takes up around 15 percent of the image in the viewfinder. So 85 percent of the shot is not really wanted, but from the camera’s point of view, that 85 percent will predominate in the exposure meter’s electronic brain.
Now I know that better cameras have ‘center-weighting’ etc., etc., etc., but unless you have ‘spot’ metering, the overall exposure decided by the camera will be an average of the bright back light and the shadowed subject in the front. This will give you a dark subject, or even so far as a silhouette, in front of a well exposed background (in this case, the beach).
With today’s automatic exposure cameras you must understand that it doesn’t know what it is that you are photographing. All the camera’s brain can see is a mixture of bright lights and dark areas and it will give you an exposure to try and equalize these out. Unfortunately, in conditions of high contrast in the tropical sun, or back lit, the camera reaches its limitations and the end result will be underexposure of the part of the photograph you want. It’s not the camera’s fault – it just means you have to get smarter.
There are a few ways you can demonstrate your ‘smarts’, and the simplest is by selective metering. You want the subject to be correctly exposed, so walk in close to the subject, so the person fills the frame, and note the exposure values. Now go to the manual mode in the camera, set the aperture and shutter speed as per the noted values, then walk back and compose the shot. The subject person will be correctly exposed against a bright background. Great shot!
Another one of these methods is by Fill-in flash. Fortunately, these days many compacts and SLR’s do have the Fill-in flash mode built in, but many of you do not use it – or even realize that you have this facility! If you have it – then use it.
Now, for those of you who have the whole kit and caboodle – an SLR with an off-camera flash, this section is for you. The whole secret of fill-in flash revolves around flash synchronization speed. Some of the very latest, and expensive cameras will synchronize flash and shutter speed all the way through to 1/2000th of a second or better, but the average SLR will probably say that the synch speed is 1/125th or even only 1/60th and it is this figure which drives the exposure setting.
Take note of the exposure settings from the position from which you are going to take the photograph. Now set the off-camera flash to around the f-stop indicated by the camera’s exposure meter. In other words, if the camera is going to use f5.6, then try two shots – one with the flash on f4 and the other on f5.6. Flashes are notoriously unreliable as to their exact setting, but by taking the two shots, one will be OK, and the other will be perfect. A correctly exposed subject against a correctly exposed background.
Brush up on your French and try ‘Contre Jour’ this weekend.


