The cameras that are now available for the weekend photographer are amazing in their abilities. Now we have almost got to rewrite the manuals of photography.
Look at all the functions that modern cameras take in their stride, beginning with Auto-Focus. When AF first came out, the motor drive was around the barrel of the lens. They were noisy and easily fooled. Less than perfect light and you could hear the lens “hunting”, going backwards and forwards trying to focus. Now AF is noiseless and automatic.
A few years ago we used to tell our photography students how to get sharp photos by keeping the camera steady, use two hands, breathe in and hold it as you squeezed the shutter, make sure the shutter speed was faster than 1/125th second, keep the elbows tucked firmly into the body and lean against a tree or a wall for additional support. Now? Image stabilization will give you sharp pictures, hand-held at 1/15th second.
Exposure was something of a black art originally, now the camera will work all that out for you, a mode control will differentiate between the exposures for action, stage, snow, summer, winter, fireworks and more, and do it all automatically.
You new camera will give you properly exposed, auto focus and sharp prints every time. But there is a limit. The camera cannot work out composition.
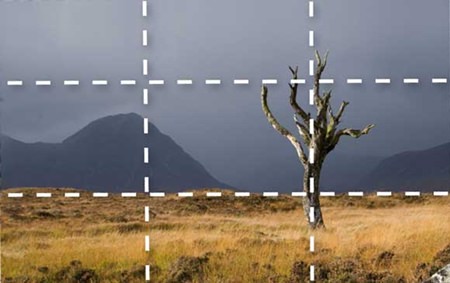
All good photographs follow the rules of good composition. The best known one of these is the Rule of Thirds, which by following, I guarantee will improve your final photographs. Mind you, this rule does expect that you have moved close enough to your subject, to fill the frame! Tiny people against vast expanses of background cannot be saved by any rule, other than the one that goes “Walk several meters closer!”
But for those of you who are not aware of the Rule of Thirds, here it is. Position the subject of the photo (that’s the hero) at the intersection of one third from the top or bottom of the viewfinder and one third in from the right or left side of the viewfinder.
By just placing your subject off-center immediately drags your shot out of the “ordinary” basket. The technocrats called this the “Rule of Thirds”, but even just try putting the subjects off-center. While still on the Rule of Thirds, don’t have the horizon slap bang in the center of the picture either. Put it one third from the top or one third from the bottom. As a rough rule of thumb, if the sky is interesting put more of it in the picture, but if it is featureless blue or grey include less of it. Simple!
With some cameras where you can make a grid pattern on the viewing screen from the menu, such as on the DMC FZ series Lumix, it makes it even easier to position the subject. With the vertical lines, you will soon see if you have the subject vertical, and for horizontal subjects incorporating the horizon, you can also make sure it is level. With other cameras, you can actually draw the two vertical and two horizontal lines on the viewing screen with felt tip pen. It does improve the final shots, believe me. And what is more, this composition is something you can do in the camera as you take the shot. It does mean that you look critically through the viewfinder and position the subject correctly.
The next item is cropping. You can do this with post-production ‘edit suites’ or even a good Photoshop style program, where you actually do just the same as we used to with two L-shaped pieces of card, but with electronics. Call up your print on the computer screen and with the cropping tools you can move them around until you feel you have the correct (most pleasing) crop. The problem comes that after doing this, you may find (usually find) that the crop is not quite what you wanted, so you might have to call up the image and go through it all again. The secret is to always work on a copy, so you have the original safely tucked away in your photo folders.
 |
 |
 |


