While the photographic world has forsaken film and gone digital, there are some situations where you need a DSLR, and not just a point and shoot (or the dreaded camera phone).

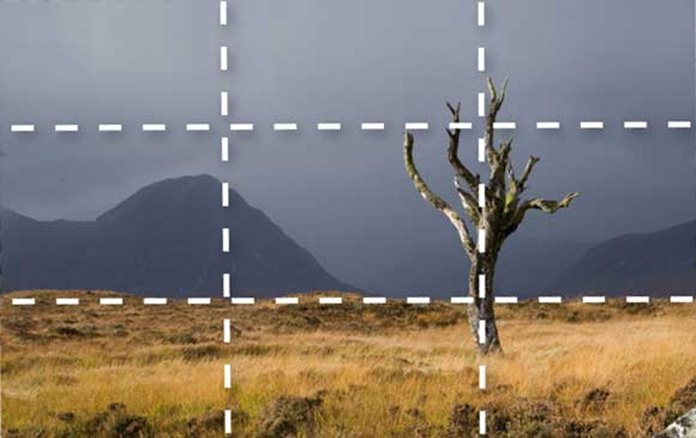
The first refers to the placement of the image in the frame. This is where the ability to instantly review images in digital photography is so good. Look at the image in the viewer on the back of the camera and see if it can be improved by different placement of the subject within the frame. Remember the ‘Rule of Thirds’ (place the main subject one third of the way in from either side and one third of the way up or down from the top or bottom of the picture). This is a tried and true rule of thumb and you can try it out so easily with digital photography. It may feel ‘wrong’ initially not having the subject slap bang in the middle of the frame, but try it and you will find you are getting better, more pleasing pictures.
While still on the subject of the overall image, don’t forget to take each shot two ways – in the landscape (horizontal) format and the second in the portrait (vertical) format. Again it sounds strange to shoot a landscape in the vertical format, but it gives the viewer a different emphasis, which can improve an otherwise ‘ordinary’ shot.
With most digitals having reasonably good zoom lenses these days, experiment with different zoom settings and distance from the subject. A ‘tele’ setting can give you a very different photograph from the ‘wide’ setting taken closer to the subject. This ability to experiment, at the time of shooting, is one of the biggest plusses for digital photography.
One of my standard tips is “Walk several meters closer”, and by doing this you will find that you can make the subject fill the frame (to even overflowing) and get rid of horrible distracting backgrounds.
You can also see the difference in the backgrounds between shooting at f2.8 as opposed to f16. The larger aperture (f2.8) gives a blurred background, which is exactly what the ‘portrait’ mode does. Many of the tricky settings are just automatic combining of different apertures/shutter speeds, and a general knowledge of first photographic principles will always help your photography too.
Photography is in reality ‘painting’ with dark and you should never forget this. The position of the subject, relative to the sun (the celestial lighting technician) can make or break your photos. The amount of contrast in any scene can also baffle the digital sensors so they will try to balance out the contrasts which can spoil the effect you were trying to create. If your camera shows you those dinky little histograms, you can soon see if the light is biased in any particular direction.
What you have to do is try and balance bright or dim light. In low light conditions, try using your camera’s night shooting mode, or lower the ISO to 50 or 100 to get some detail in low light. Also look at trying to use a tripod, or steady yourself against a wall or pillar to avoid moving the camera.
In bright light, try your camera’s Beach or Sunshine mode, or go to manual mode and choose a fast shutter speed to control the amount of light that comes in.
Be careful if you place your subject in front of a bright window or they will become a silhouette. Try placing them off to the side of the window instead, or facing a natural light source.
For better photographs indoors, turn your flash off. Try to maximize the light by pulling back the curtains, opening doors and turning on the incandescent lights in the room. Sure, you will have slower shutter speeds and you may have to look at using the tripod, or even just holding the camera firmly on a table, but you will get more natural photographs.
Finally, practice getting the ‘decisive moment’ by partially depressing the shutter button when taking candid shots. This means you are not waiting for the camera to focus, before the shutter fires. Or simply set the focus manually.
 |
 |
 |


