We have all, at some time, tried to take photographs of moving objects. Provided they are going no faster than the average garden snail, this is no problem, and any old camera will do. However, by the time the snail shifts into top gear, we can start to have a problem.
So you want to show action? The answer is “panning”, and it can turn up some gold. Panning is one of the best ways to really show “action”. Now your camera will have an “Action” or “Sports” mode that you can select at the flick of a switch, but professional action sports photographers don’t use it.
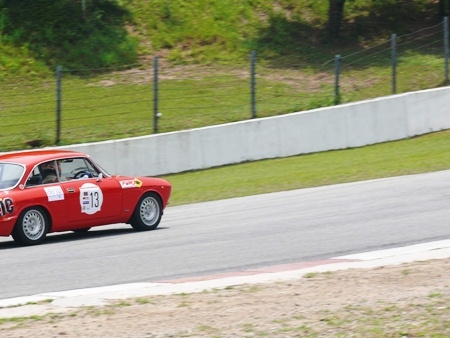
 Too early!
Selection of the “Action” mode puts the camera on to a fast shutter speed to “freeze” the action, giving you a very static shot of your moving subject – a shot which does not imply movement or action at all. A shot of a cat running can end up looking as if the animal was frozen to the spot with its legs in a strange position.
Contrary to that which you would imagine, the technique to show speed and action is not a super fast 1/zillionth of a second shutter speed or even faster with some of today’s super SLR’s – but rather something around 1/15th to 1/30th. Now that really is surprising, isn’t it? However, for this to work, the technique to handle this slow shutter speed requires panning.
The objective with panning is to be able to “stop” the moving subject, but leave the background a blurred smear. This is carried out by moving the camera in time with the moving subject, so that the subject is in the center of the frame at all times, while the background “moves” behind the subject. Moving the camera to keep the subject in the center means that the slow shutter speed is “fast” enough to stop the subject’s action, but too “slow” to stop the effect of the movement of the camera on the background.
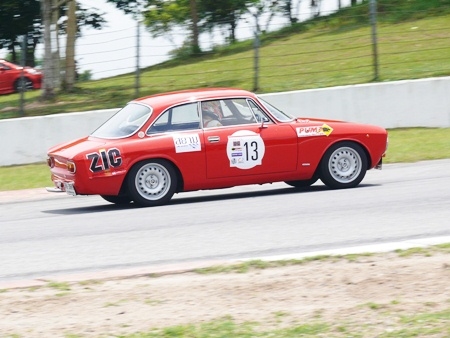
 Got it right this time!
This, by the way, is not an easy technique and will require that thing called “practice”. Begin by picking on an easy subject, like motorcycles going past you down the road. Start by selecting 1/30th of a second for the exposure and practice turning your body as the subject moves past you. You have to synchronize your movement with that of the moving subject, and when you press the shutter you must continue to move at the same speed especially when the viewfinder goes black as the shutter fires and you cannot see the subject for a brief instant – the most important brief instant.
When you have become good at this technique at 1/30th of a second, it is time to then try 1/15th of a second. At the slower shutter speed, the background will become even more of a streaky blur, giving an even greater impression of speed and action.
With the old SLR film cameras, you could use the WYSIWYG feature (What You See Is What You Get) and see directly in the viewfinder what the final image would be, so panning was difficult, but not impossible. With the new digital age of ‘easier’ photography, it turns out that panning is actually slightly harder. The reason is that the electronic image you see is not quite “real time”, but there is a split second difference, and in that split second you can lose a moving image.
Take a look at this week’s photos. A classic car, doing around 100 kilometers per hour. In the first shot, the shutter was tripped too early, so we have lost the back half of the subject. In the second shot, the photographer managed to get the car central as he moved the camera in time with the car.
To show action and movement, select a slow shutter speed and stand side on to the action. Turn your body as the subject goes past, keeping the subject in the center of the viewfinder. When the subject is directly opposite your position pop the shutter, while still continuing to turn your body in time with the subject. With luck, you’ve got it!


