There is a tendency to put the camera away when thinking about taking photographs at night. It all seems a little hard, and the built-in flash on the camera is lucky to illuminate your shoes, let along palm trees on the beach 50 meters away.
The books are ready to bamboozle you with requirements such as grad filters, polarizers, horizons, rule of thirds, verticals, digital instant check, meter medium bright areas of sky, and bracketing. The same books tell you subjects that need to be metered manually are most atmospheric optical phenomena such as cloud coronas, iridescence (usually), all halos (if near the sun); some cloud types such as bright cumuliform clouds, and in general any clouds that you photograph with a polarizing filter, and never meter on the foreground if you are taking pictures of the sky. The foreground is most often a few stops darker than the sky. Conversely, never meter on the sky if you are taking pictures of something on the ground.

Since so many scenes in nature contain a greater range of light than our cameras can record, graduated neutral-density (ND) filters are a must in the landscape photographer’s bag.
Grad ND filters are generally used to darken a background that’s significantly lighter than the foreground. Common examples are sunrises and sunsets with bright skies and foregrounds in shade or mountain scenes where a snow-covered mountain is much brighter than the foreground.
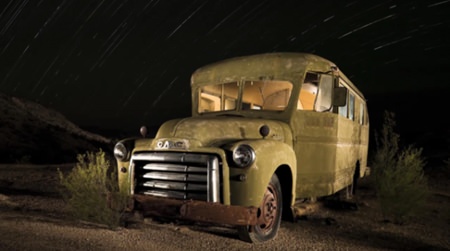
However, there is another style of photography when taking shots at night including the night sky. The simplest way is long time exposures, and a tripod, of course. Start with as wide an f/stop as your lens allows, and shutter speed of about 20 seconds. Any longer than that and the stars will begin to blur, because of the earth’s rotation. Increase the ISO as needed for a good exposure.
However, incorporating the foreground with the night sky can produce some different photographs. What you have to do here is light up the foreground. Using a wide-angle or fisheye lens, you can also incorporate the foreground into your images. Depending upon the subject, the foreground as a silhouette may enhance the overall image, or detail in the foreground may complement the night sky. The foreground can also be lit using a variety of techniques, which I think produces the most dramatic results.
Painting with Light is another technique that can be used if the foreground is close enough. There are two ways to paint with light: using a constant light source such as a flashlight or with studio lights.
Constant light source: while the shutter is open, use a constant light source to illuminate the foreground. Move the light around during the entire exposure so you don’t end up with hot spots. Use the headlights from your car for something easy.
(Courtesy of Nikon), here are Tips for Night Sky Photography:
Look for cool clear moonless nights (unless you specifically want to photograph the moon!), and avoid light polluted areas (big cities or towns).
Start with fresh, fully charged batteries.
Use a sturdy tripod and cable release; set up your composition, lock down the focus, and make a test shot. This will help determine exposure, and if you need to make any changes to your composition.
Set the white balance between 2800°K-4000ºK. Check the histogram after you take the picture to make sure the image is being properly exposed. It’s easy to underexpose the stars or overexpose a foreground.
Zoom in to the image on the LCD to check sharpness.
Consider making a series of exposures for the foreground to merge as an HDR composite with the stars.
A good starting exposure for most star shots is to use the widest aperture on your lens, expose for 20 seconds, increasing the ISO as needed for a good exposure.
If you’re going out to specifically shoot the moon, research the phases of the moon, so you know what time the moon will be rising and setting each evening so you know when to plan your shoot. Also note the direction it will travel in the sky to plan your composition.
So there you have it – go out tonight with your camera and shoot.


