As a commercial photographer, much of the work that came along was tabletop
photography. The most usual was for catalogues, and you have all seen those,
just have a look in your letterbox.
These are generally photos of individual items, all placed in
the same positions and all of the same size. This style of catalogue photography
is very easy and not beyond the capabilities of any weekend photographer with a
good camera and some lights, and these do not need to be expensive either.
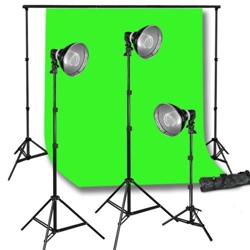
For this type of commercial photography you will only need
three lights - one on one side of the object, one on the other side and the last
one to light the background.
Now in the professional arena, the main lights will be flash
heads, usually triggered off by an Infra-Red sender from the camera, but for the
weekend photographer, you do not need to go to this expense to start with. You
can buy internal reflector lights - the kind of light often used as a spotlight
in the garden. My first ones were attached to dinner plates with tape, so they
didn’t fall over.
The two front lights (left and right) you should place at
around 45 degrees from the camera axis, and one should be twice as far from the
subject as the other. You are not looking for flat lighting here, as it is
necessary to get some shadow to give the object some form. This is called
‘modeling’, and expensive flash heads even have tungsten lights built in, and
these are called modeling lights. These two main lights you can play with to get
the effect you want, but once you have the result required, leave them alone, as
you want the lighting to be the same for all the objects.
Because there is a linear relationship between these two
lights and the square of the distance from the object, you can work out what the
ratio is going to be, but at this stage, go on the appearance that your eyes can
see.
The background light is also very important as it is needed
to give some visual separation to make the object stand out from the background.
I have found that lighting the background from below gives a good gradual
tapering off of the light and again is left in position once the desired visual
effect has been found.
Now if you are using the cheap tungsten spotlights, you now
have to reset the white balance on your camera, or else you end up with
different color casts which makes the objects look wrong, but once you have done
that - fire away!
One item you will have to decide upon is the lens you are
going to use. If you opt for a wide angle lens, you will have problems with
distortion, as you will be shooting very close to the objects. If you move
further away, the distortion will be less, but you will get all kinds of other
images in the photo. The answer is to use a longer lens, so that you are further
from the objects, and less likely to have light getting into the camera.
This longer lens does produce some other problems, in
particular depth of field. In any catalogue, you cannot have the object going
out of focus, so even though you are using a long lens, which produces a very
short depth of field, this must be overcome. You do this by selecting the
smallest aperture (which is the largest number on the lens) and around f16
is fine.
But this also means you will need a proportionally longer
exposure time, so when shooting still-life objects you will need a tripod. For
this type of photography, you do not need a large expensive tripod, but the
small tabletop variety will be perfect. You can expect a shutter speed of
several seconds.
So, to successfully carry out tabletop photography, you need
three lights, a long lens and a tripod. It is not too difficult and if you
follow the instructions this week, you will be able to produce good images which
could be used in a catalogue.
Try your hand at it this weekend.