Weekend photographers who used polarizing filters in the days of film (remember
waiting for the one hour D&P shop for your prints) have strangely seemed to
avoid this filter for their digital cameras, especially DSLR’s.
Whilst there are no polarizer advantages unique to digital
cameras, digital cameras with limited dynamic range can benefit greatly from the
selective suppression of excess contrast. Due to the limited UV sensitivity
found in most digital cameras, polarizers also work well for haze control,
especially with the haze we have in Thailand, thank you Malaysian forests!
Quality polarizing filters are different from most others in
the fact that they are made up of two distinct elements. There is an outer ring
that rotates the outer “glass” relative to the inner element. This increases or
reduces the degree of polarization to allow the photographer an endless range of
polarized effects from one filter.
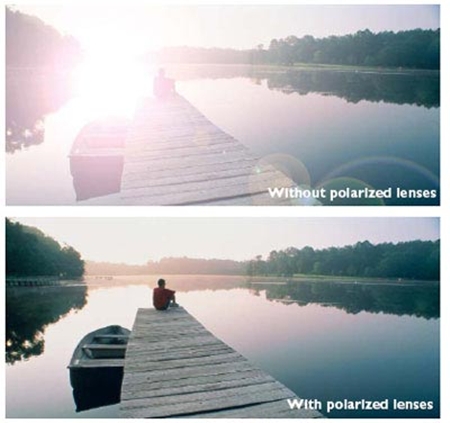
The principal behind these filters is to remove reflections,
and funnily enough it is reflections that take the color out of color
photography. Look at the surface of a swimming pool, for example - a shiny
white, non-transparent surface. Now look through a polarizing filter and you can
see right down to the tiles on the bottom of the pool. And the people frolicking
in the pool!
What you have to understand now is that these filters remove
reflections from any surface, not just water. The reason you cannot see through
some normally transparent windows is because of reflected images on the surface
of the glass. The reason some tree leaves appear to lose their color is through
reflected light from the sky above.
One of the traps for young photographers is that because you
know the grass is green, you see it as green when you look through the camera
viewfinder - even though it is not truly well saturated green. Look again at the
scene in the viewfinder. The green grass is really a mixture of green and
silvery reflections, dark shadows and pale green shoots. Put the polarizing
filter on the lens and slowly rotate the outer ring. Suddenly the silvery
reflections disappear and become a deep, solid green color. The grass is now
made up of green, dark green and pale green. This green will really leap out at
you and smack you fair between the eyes!
Your next beach scene when taken with a polarizer will really
amaze you. Again, slowly rotate the outer ring on the polarizer. Look critically
through the viewfinder and you will see the sky take on a much deeper color to
highlight the white clouds. Keep turning that outer ring and the sea will change
to a deep blue to green luminescent hue. The end result is at your command. Try
taking the same shot this weekend, but with varying degrees of polarization and
see the differences in the final shots.
So, if the polarizer is such a wonderful bit of gear, why do
we not make it a standard piece of equipment on all cameras? Well, like
everything, there is a downside as well as the upside. In the case of the
polarizer it does its bit of brilliance at the expense of the amount of light
that gets through to the lens. With most polarizing filters you will lose about
one and a half stops of light. What this means is that the shutter speed will be
at least twice as long to record the same scene, or that the aperture will have
to be twice the size. This means that you are more likely to get camera shake
effects and suffer from lack of depth of field when using the polarizer.
However, with shots in the bright sun, a polarizer will bring a new dimension to
your shots.
By the way, when using any filter on your camera, I suggest
you use a stepping ring to increase the diameter of the filter, so there are no
unwanted vignetting effects, especially with wide angle settings. My regular
camera has a 55 mm diameter lens, which I have then stepped up to 62 mm so takes
all my old filters. This is really a good idea and cuts down the number of lens
adapters you will need. Including the polarizer.
